Cameras
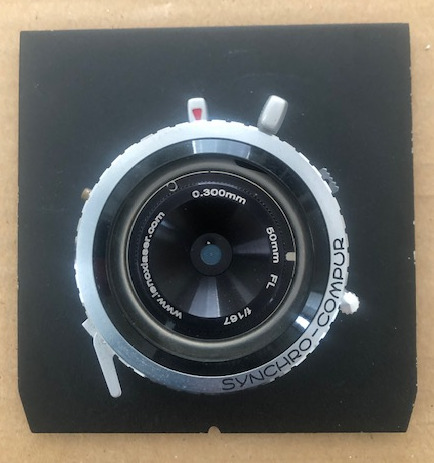
Laser cut pinhole in a large format mount
Introduction
Like a lot of people, I started out making my own pinholes from brass sheet, with mixed results. With time, I could make thin material and a decent hole, but getting clean edges and a round hole was a bit hit or miss. Eventually I just decided to buy a laser cut pinhole.
This is a 0.3mm laser cut pinhole supplied in a mount for fitting a Copal #0 shutter from Lennox Laser. This aperture is around f187 at 50mm, f250 at 75mm, or f333 at 100mm. The shutter is an old Synchro-Compur which is unreliable at any setting other than Bulb. However, in the pinhole world an exposure shorter than 1/4 second is unusually fast, and manual operation on B will provide times like this or longer with a lockable cable release. For really long exposures the shutter preview lever still works to hold open the shutter.

I still tend to use a purpose designed pinhole camera (the Zeroimage 6x9 or my 4x5 WillTravel) for projects, but the pinhole in shutter is a very portable option for the large format cameras.
Good pinhole subjects
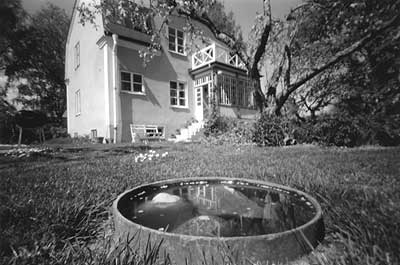
Pinhole image resolution is limited by the size of the pinhole and the distance to the film. This means that very fine detail, especially at middle to long distances, will not resolve well. So many pinhole pictures are close-ups. Even with more general views it often helps to have a strong element close to the camera.
Because of the small apertures, good light is advisable. With proper reciprocity correction, long exposures can do well. Small moving objects like cars and people will not show with exposures of a a minute or more, though moving clouds can streak. It is also possible to do interiors by careful use of a flash gun to ‘paint’ in the room. The number of flashes has to be calculated, as the aperture is smaller than usual.
In use
Having the pinhole pre-mounted in a threaded disc that fits the front of a Copal #0 shutter is really convenient. Being able to use an otherwise unusable shutter is a bonus. The aperture on the shutter is left wide open. The unit is mounted on a Wista/Technika compatible lens board, which means it can be used on any of my regular view cameras - the Galvin 2x3, the Wista 4x5, or even the Intrepid 8x10. This pinhole size is a bit of a compromise. Trying various pinhole calculators will suggest something other than 0.3mm for some distances.
There are two main issues with using pinoles on view cameras. The first is how much the bellows will compress, which governs the minimum film to pinhole distance. The second is if the baseboard of a field camera will appear in the picture. This can be determined by locking the shutter open and sighting through the pinhole from the edges of the base. If the pinhole is illuminated (the ground glass is visible) then the base may be in the image. Dropping the bed is usually enough, even for vertical compositions.
The Galvin 2x3 has a minimum film to pinhole distance of 75mm with the bellows fully compressed. Since there is no base board (this is a monorail camera), that issue does not arise. The Intrepid 8x10 has a natural minimum extension of around 100mm. Dropping the bed on early models requires an angled mount to get the front standard parallel to the film, and even then the bellows may mask the edges of the 8x10 film. The Wista 4x5 and M.P.P VII do fairly well with the bed dropped, as the front standard is easily brought back to give a 50mm film to pinhole distance without any bellows masking.
Sticking to horizontal format can help avoid the base board appearing in the picture, as can working with a longer pinhole to film distance. However larger distances reduce the sharpness and the effective speed, so there are practical limits.
Camera alignment is largely a case of estimation based on the straight lines from the film corners through the pinhole. A crude view can be obtained using a lens panel with a large (5mm-ish diameter) hole.
Pinhole cameras really require a tripod or a firm mounting of some sort. I’ve seen some really nice hand held digital pinhole work, where the result is reminiscent of an Impressionist painting, but anything like a sharp picture needs a steady base.

Some degree of action is possible, considering the exposure is likely between a half and several seconds. See ‘Leaving Richmond Marina’ in the World Wide Pinhole Photography Day gallery for 2010 (image number 3802). The camera was on a tripod. Due to the channel location I had a good idea of the line boats were taking so I could visualize the alignment of the various elements.
References
-
A hand made pinhole. The method I used was to obtain some thin brass sheet (thick paper thickness), and cut out a square with tin snips. I then used a round ended rod and a hammer on a soft (mat board) base to make a shallow dimple in the center. I then took some fine sandpaper and sanded down the bump side of the dimple a little. Finally I pressed a fine needle in the center to just pierce the metal, and rotated it gently to get a clean edge. A magnifier is used to inspect the hole and estimate the diameter against a millimeter ruler.
It is possible to use some alloy cut from a drink can. But this has a natural curve, and will have very sharp edges, which makes handling more difficult. It is best to round the corners and smooth the edges before trying to make the pinhole.
The aim is to get the metal as thin as possible at the hole, and the hole evenly round. The needle tends to tear the metal if pushed too hard. A drilling motion can help. It takes practice to learn the material.
-
Lenox Laser (DaystartLaser) They quote the pinholes in microns. A micron is 1/1000th of a millimeter, so 0.3mm is 300 microns. There are other sources, such as RealitySoSubtle.